Thursday, January 31, 2013

Keep Calm and Stache On

While I am in the process of making over my craft room, I have been having a little fun with some of my decor. A long, LONG while back, I used a coupon to order some free prints. They are canvas material but not on a canvas, so I was never really sure what to do with them. Hence the reason they have sat for so long. I finally decided to just frame them. And then...
 I added a little pizazz!
The mustaches are just scrap booking embellishments that I found at Hobby Lobby. They are adhesive on the back so I just stuck them right to the frame. I love that they are blinged out.
 
The kids especially thought this was hilarious. Total cool mom points right there!


Wednesday, January 30, 2013

YW Theme Necklace

About two days before Christmas I was given a new calling at church. I now work with the teenage girls (12-18 years) and love it. Every year the youth at church have a new theme. This years theme is Stand in Holy Places. I was pretty excited to start looking for some fun ideas for the girls. I found a necklace on Pinterest and wanted to recreate it.
 
I bought the bezels, epoxy stickers, and giant spool of chain at Hobby Lobby. I can not tell you how happy I am that they carry that stuff now. I simply sent the scripture printout to Sam's Club to be printed like a picture. Punch out the scripture with your 1" circle punch, glue it into the bezel with a little Elmer's glue, and pop an epoxy sticker on top. I added a little pearl and a little charm that reads "made with love" (although I just realized I took a picture before adding the charm).
 
We gave these to the girls at our annual New Beginnings night and I think they were a hit. I figure they cost me a little under $2 a necklace, which is pretty good. Especially when you only have about nine girls to make things for.

Tuesday, January 29, 2013

Rosette Dress

A short while ago Shwin and Shwin posted on Facebook that they were in need of some pattern testers. I was beyond eager. Only problem was that I was at school, on a break, and could NOT get my phone connected to sign up as one of the testers. I called my husband... no answer. I called my mom... no answer. I called my sister... you get the point.
In a fit of desperation, I called my dad. That's right, my good ol' dad totally saved the day and signed me up. Love it! And love the dress I ended up being able to test.
It is called the Every Little Thing dress. So adorable and so versatile.
These pockets might be my favorite thing about the dress.
When I made it this time around, I omitted the big bow and added a little rosette trim I had left over from the camera strap. Love, love, love it!


Friday, January 25, 2013

Mistletoes

I found this super cute image on Pinterest and immediately pinned it. Such a cute idea that I knew I needed to recreate it as Christmas gifts for my mom and mil.
Even though mine turned out a lot more simple, I still love it. I think the grandmas loved it, too.
 
Side note: An 8 and 4 year old footprint are a lot harder to "stamp" nicely on a plate. And I never took a final picture after I fixed the zero in 2012. Oops!

Thursday, January 24, 2013

Dress-Up Necklace

Over the summer, I was looking around on some of those daily deal sites while at my in-laws. My mother-in-law mentioned that she had seen a really cute necklace. I looked it up and printed it off. I knew pretty quick that I would be able to recreate it.
Super cute and in a ton of colors. Only problem... they were a little pricey and then shipping made it even worse.
 I strung the pearls onto jewelry string and attached the ends to jump rings. The ribbon is then also attached to the jump rings and tied in a bow on one end.
 
A few difference:
1. I used more pearls because I liked the look.
2. I also alternated between big and little pearls.
2. I couldn't for the life of me find any of the ribbon clasp thingy (Totally a word, according to my four year old. Except she says fingy).
 
If you make sure that you buy the pearls, ribbon, and jump rings at Hobby Lobby when they are half off you can make these for a screaming deal. And those are my favorite kinds of deals!

Tuesday, January 22, 2013

Car Seat Cover

Either I am crazy baby hungry or I was bit by the sewing bug, because I have been sewing nonstop for my friend that is about to have her first baby. Maybe a little of both?
I used sort of a combination between this and this tutorial. I have made quite a few covers so I usually ask the person if they prefer the ribbon ties or the Velcro loops. And then I get down to business.
I kept this one pretty simple, because my friend isn't really into the super girly stuff. I also used flannel because it is January and let's face it, Wyoming is bitter cold. And don't even get me started on the wind here.

Monday, January 21, 2013

Dress Pattern

Honestly... I have never really bought a pattern online. Mainly because you can find so many cute ones for free and a little because I wanted to get really good at sewing before hand.
 
A little crazy? Maybe... But I just never really felt like committing to anything.
http://www.etsy.com/shop/littledresspattern
Until I saw this. Holy of all holies, this dress is beautiful! I did hesitate for about a minute because of the $6 price tag. I can be cheap sometimes.
 
During that minute I contemplated trying to figure it out from the pictures, but then realism set in. So I pushed the buy button and I had to wait a day and I almost died it was instantly mine.
This pattern is awesome. Such a great dress. A little time consuming, but totally worth it. I think next time I may trim down the sleeves a tad. You know, just because. I will warn you, it takes a ton of paper to print the pattern. Again, though, worth it.
 
The fabric is my favorite. I have been hoarding this fabric for over two years. I was pretty excited/scared to cut into it.
 
This pattern was so worth the $6 I spent. I have ideas for an all chambray one and I can't wait.

Sunday, January 20, 2013

Fabric Covered Cork Board

My craft room has been pretty neglected style-wise. I just really couldn't figure out exactly what I wanted to do with it. I have white walls, a HUGE white table, a white serger, a white sewing machine, a white Cricut, a white printer... You get the idea! It needs some color and I needed some inspiration.
 
I was at Hobby Lobby trying to find some fabric for my sister. Long story short: I bought some minky fabric to make a blanket, it turned out AMAZING, went back to buy more because my sister asked, and they were out. Go figure, right?
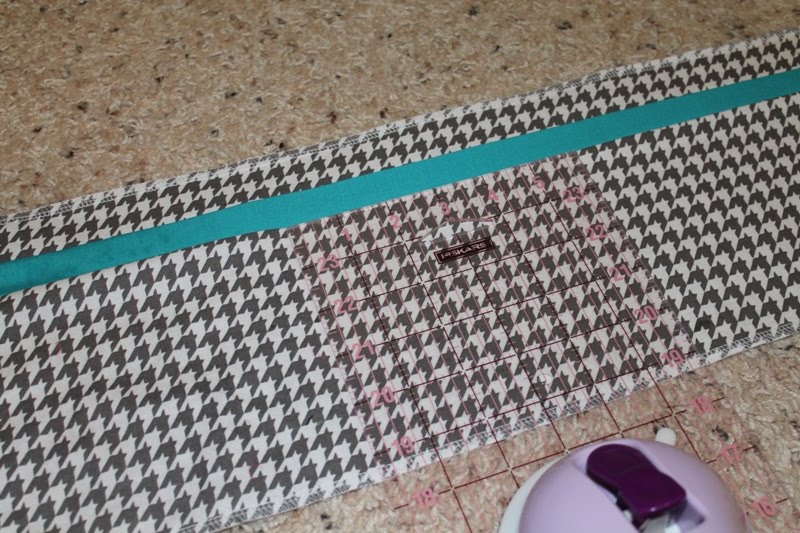
Not to let my trip to Hob Lob go to waste, I meandered through the fabric section and found this fabric. Love, love, love! And seriously, where else is my husband going to let me put a bunch of pink in our house? 40% off in hand, I only needed a yard, which actually ended up being more than enough.
I bought two cork boards at 30% off making them $6.30 each. Side note: I know you are thinking "why did you buy two boards instead of just buying one big one?" Answer: I bought one board awhile ago when I was going to do a PB knockoff, but I liked this idea better. If I were to do it again, I would totally only buy one gigantic board.
Turn the boards upside down and line them up. Now staple the heck out of them. I got a little carried away and didn't get them centered on occasion, but who cares? This will keep the boards together while you cover them. Remember, if you buy one board, you obviously can skip this step.
Lay your fabric right side down and place your cork board right side down on top of it. Starting with the long sides, begin pulling your fabric up and over your board. Staple as you go. If you look at the picture, I stapled the fabric where the cork is. BAD IDEA! I had to pull them all out and redo it. The staples are too long and poke through the other side. So staple the fabric directly to the wooden frame. You can thank me later.
The hangers came with the board. I used two for this size. I marked where I wanted them and hammered them into frame. Again, not in the cork! I made that mistake, too.
I absolutely adore how it turned out! Stay tuned for some super cute push pins to go with my new cork board.
I Heart Nap Time
Lil\'Luna

Thursday, January 10, 2013

Do These Pictures Make Me Look Crazy?

Some days I pop the old SD card into the laptop and find this...
Bawhahahahahahahahahahahahaha!
 
She truly is something else. My sister thinks she looks like the llama from Napoleon Dynamite in some of them. When she saw the pictures, she was laughing pretty hard herself, saying "I am so funny!". I just hope she always has this much confidence.
 
Love this girl! 

Wednesday, January 9, 2013

Easy Headbands

A lady from my church gave me a box of random sewing stuff a few months back. In the box were a few pieces of vintage looking ribbon. Sadly, the rest of the box was kind of a dud, so these were pretty much the only things I could use. 
 
I decided to use the ribbon to make some cute, little headbands for Savanah. Anything I can do to keep her hair out of her face. Drives me crazy!
Super cute, right?
 
I began by measuring her head, which was 19 1/2". Cut your ribbon an inch and a half smaller, making mine 18".
Then cut a piece of elastic 1 1/2". Sew the elastic to the ends of your ribbon. About 1/4" of the elastic will end up being your "seam allowance".
 
Super cute and super soft! No more complaining about those hard, metal headbands.
 
Granted she promptly asked for it to be removed so she could continue on with her pony watching business. Such a diva! 
On another note: Guess who finished off one of her spools on her serger? That's right. Such an exciting day for me!

Saturday, January 5, 2013

Vertical Pleats

I have been making a ton of skirts lately. I have a friend that is having her first baby, so I am definitely making sure that she is well stocked. I will admit though, it is making me VERY baby hungry. Curses!
I started by cutting three pieces of material. This skirt was made to fit a baby size 0-3 months.
1 piece (main fabric) 6x28"
1 piece (coordinating fabric) 2x28"
1 piece (main fabric) 2x28"
Serge or sew all three pieces together.
Your fabric will look like this.
Working with the wrong side of the fabric facing up, fold the serged edges towards each other while pressing with an iron.
Like this.
Flip your material over so the right side is now facing up. Using a ruler to keep it even, fold the top (main) fabric down and over your coordinating piece. This will create another pleat. Iron the heck out of your pleats. Seriously, iron a ton!
With rights sides together, serge or sew your fabric ends together creating a tube.
 
 Hem your the bottom of your skirt.
 Along the top, creating a one inch casing for your elastic.
Attach a safety pin to one end of your elastic and begin threading it through the casing. One trick I use is when the opposite end of your elastic is almost gone, pin it so it doesn't slip through into the casing. No one likes re-threading the elastic. No one!
 
Zig-zag stitch your elastic together.
Add a cute little tag or piece of ribbon into the opening and stitch closed.
I was a little worried about my pleats separating so I added a little heat and bond sporadically so keep the pleats down.
So excited for my friend to have her baby and to see her in all the cute itty bitty things I have been making. Why is everything infinitely cuter when it is teeny?

Friday, January 4, 2013

More Elf on the Shelf Ideas

Yes, I realize that Christmas is over, but the last half of December ended up being crazier then even I anticipated. I got a new calling at church, yea! It is a big calling, eh...
 
Time to finish off most of our Elfie ideas. You can just tuck this away for next year.
My kids started the "my daddy's gone again and I am not going to listen or do what I am supposed to" kick about half way through the month. Elfie had to send a little note from Santa. 

Elfie got caught in the Wyoming wind on the way back from the North Pole that night and didn't quite make it back before the doors locked.
At this point in December we still didn't have snow so Elfie improvised.
The kids loved when Elfie turned our milk pink.
Spending the night outside finally caught up to Elfie, he slept most of the day.
And then ended up with a pretty bad cold.
By far my favorite: Elfie apparently didn't realize that the Barbies were already in relationships.
And finally, the "mom forgot to move Elfie so she panicked".