Sunday, September 4, 2011

I Thought I Could...

I found this picture on Pinterest the other day, but sadly there was no tutorial with the link.  I studied the picture for a while and then got to work.
I started by measuring Savanah around the bust and from her bust to her knee.  I added two inches to the bust measurement and cut two pieces.  I cut mine at a slight A line so that it would flare a little at the bottom.   

Using my template I cut out my sleeves on each side.  A trick to this is to line up all the edges so you only have to cut once.
Using my black fabric, I cut two pieces that were the same width as my dress and about 5 inches long.  Fold in half length wise and iron flat.  Sew/serge your black border to the bottom of each main piece of fabric.  Make sure to place right sides together.  Iron your seams down.  
With right sides together sew/serge your two dress pieces together.  I really try to make sure that the bottom borders line up.
This is what it should look like once you flip it right side out and iron your seams.
Side note: For future reference I would make the bottom border a tad wider.  It seems a little too narrow in this picture.
To finish off the edges of the sleeves, serge the edges and then fold under and sew around.  If you do not own a serger, you will need to do a double fold to hide your raw edges.
Now the somewhat tricky part...
Cut another piece of your coordinating fabric.  In my case, the black fabric.  My piece was double the width of my dress and about 4 inches long.  Sew you piece of fabric, short ends together, into a tube.  Serge one side and fold under about an inch around.  Iron flat. 
For the other raw edge, fold under twice and top stitch. This will look a lot better then leaving a serged edge like I did in the picture.
Using your seam as a guide, find the middle of the back of the dress.  Pin the seam in your black fabric to the middle of the dress.  To do this, you need to wrap the folded over inch over to the back side of the dress.  Make any sense?  If not use the picture for a reference.  The right side of the ruffle should be facing you. 

Next, fold your ruffle piece in half so that you can find the half way point on the other end.  Mark your spot and attach it to the half way point on the front side of the dress.  Pin around.  Again, use the picture!
You need to make a casing for your elastic.  Do this by sewing around the top of your ruffle about a half an inch away from the edge.  Make sure to leave about an inch open to pull your elastic through.
Cut your elastic to the width of your child's bust.  Pull it through your casing and zig-zag stitch the two ends together.  Once your elastic is in you can sew your small opening closed.  And you're done!
My only issue with the dress above is that I made the ruffle a little too wide.  You can see the difference between the ruffle on my dress and the one above.  I will be making another one and will post a picture with the mentioned adjustments.

Enjoy!

Saturday, September 3, 2011

Creative Storage

I am always looking for fun, new ways to store things around he house.

For the longest time I kept my makeup in simple makeup bags under the sink.  My only issue with this was that every morning when I would put my makeup on I would have to go digging under the sink to find the bags.  Eventually that would get too obnoxious so the bags would just stay on the counter.  Not okay!

I know a lot of people keep their makeup in the drawers in baskets, but our bathroom just does not have that kind of room.  Enter pottery!
I found these pots at Hobby Lobby several years ago at the end of summer.  Because they were a summer item, I got them 90% off.  Making them EXTREMELY cheap.
I love the look they add to the counter.  Still keeping everything neat and decorative.  It is also a lot easier to find what I need.  No digging around in a bag or my drawers.

Try to think outside the box when storing items around your house!

Monday, August 29, 2011

Miss Captain America

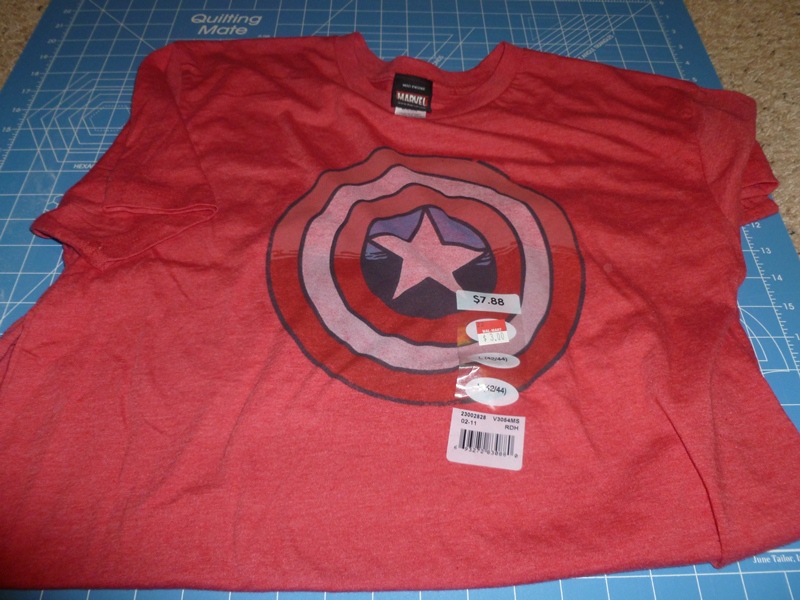
Although I absolutely HATE the Walmart here, I went the other day to try to find some basic white shoes to dye.  I didn't find the shoes but I did find this cute shirt for $3.  I knew I could turn it into something for Tana.
I started by cutting off the sides of the shirt.  I measure around Tana's upper body and added a few inches to the sides.  I wanted the end product to fit loosely.  Make sure that you cut evenly on both sides so that your image is still centered.
I then cut the top as close as I could to the original neck line.
I decided to cut the sleeves from the existing sleeves.  It worked great because I could use the existing hem of the sleeve and not have to worry about trying to resew.  I cut to pieces from the sleeves at 6x12.
Using my sleeve template from this post I cut a J shape from the sides of my pieces.  Continue following the Peasant Top tutorial to finish the dress.  The only difference is I made mine into a dress instead of a shirt. 

Once I had the dress constructed, I followed this tutorial to make the elastic casing in the middle.  I measured up from the bottom and marked where I wanted the casing to be.  I chose to have the elastic sit lower on her waist as to not take away from the print.
I love how loose and comfy it is.  This dress will definitely last for a while, which makes it even better.
The diva can still move around and play doggie, which makes it a winner in her book.  To finish off the look I decided to use some of the scraps to make a little flower for her hair.  Giving her that extra little sass!

Sunday, August 28, 2011

Sassy Stool

Although Tana is potty trained and has been for almost a year, she is still way too short to get onto the toilet by herself.  I was helping her with this task, but since her bladder seems to be the size of a pea, it got old quick.  I have been looking for a cute stool for their bathroom for a while but it seems that everything is bright and plastic.  Not my style! 

I didn't give up hope and finally found what I wanted at HL.  I found it in the unfinished wood section for only about $6 or $7.  It did have a sticker on the bottom that said "for decorative use only" but I am not worried.  The thing is sturdy and can withstand my two-year-old's weight. 
I gave it several coats of white spray paint, making sure to sand a little in between.  When I have the coverage that I wanted I became a little more liberal with my sanding.  After distressing it a bit I inked the bare wood. 

I L.O.V.E how it turned out.  Perfect for their vintage bathroom.  Added bonus: I don't have to help her... as much!


Friday, August 26, 2011

Friday I'm In Love

This baby came in the mail today.  It was definitely time for an upgrade.  My parents bought my first machine, a Singer Featherweight II, before Shawn and I got married.  It served well as my "learning machine" but now that I have improved it was time for something that could do a little more. 

I love her already.  Have I used her?  No.  But I have read the manual and she seems great.  Happy early birthday to me!

On a funnier note: 
When I picked Landon up from school today I told him that my new sewing machine came in the mail.  This is what followed:

Landon:  Is it a brother or a sister?
Me:  What?
Landon:  Is it a brother or a sister?
Me:  Landon, I don't understand what you are asking.
Landon:  You were talking on the phone the other day and said you might get a Brother sewing machine.  So, did you get the Brother or a sister?

LOVE HIM!

Thursday, August 25, 2011

One Organized Princess

Aunt Nell is always sending me emails with great ideas.  I love when I see them in my inbox!  One idea in particular was sitting in my inbox for quite some time.  Sadly, I cannot for the life of me find the email with the picture.  I have also tried googling different words, but nothing!

The idea was finding decorative knobs and attaching them directly to the wall.  The image had vinyl lettering over each knob.  It really is such a cute idea, but because we have moved so many blasted times, I decided to tweak it a little.

I searched for the perfect knobs for a VERY long time and finally found them in Rexburg, ID of all places!!  I got these knobs for $2 a piece.  Beat that! 
Instead of attaching them to the wall, considering we would probably move again in a year, I wanted to make it portable.  I headed on over to Home Depot and found a piece of wood in the clearance bin.  I painted the piece hot pink and sanded down the edges a bit when dry.  Then I measured out the piece and did a little math until I found where I wanted the three knobs.  I enlisted my sister's help to drill the holes and added the knobs. 
Finally, I cut some vinyl with my Cricut and the Storybook font.  I added the vinyl with transfer paper because it makes it so incredibly easy.
Attach hanging brackets to the back and hang it up.  I hung it low enough so that Tana could have easy access to it.  And it looks great under her bow frame.

Wednesday, August 24, 2011

Meet Toothy

...and his sister, Toothina!  I LOVE THEM!!!

I have seen this idea on some random people's blogs.  I am assuming that they made them because I don't think I have seen anything like this to purchase.  And why would you when they cost so little to make. 

I started by printing off a picture of a tooth.  I could have drawn one myself but, alas, I am a perfectionist.  I used this as my template to cut out a front and a back piece.  With my front piece I hand stitched eyes and a mouth by doubling up my thread in my needle.  I could have used embroidary floss but did not have the colors I wanted on hand.
On the back I cut a piece of felt to fit on one of the "feet".  This will serve as a pocket for your child to place their tooth.  When the tooth fairy takes the tooth, the money can be placed in the same pocket.  This was also handstitched.
Line up your pieces, wrong sides together, and begin hand stitching your tooth closed.  When I had about 3/4 of the tooth sticthed, I began adding the stuffing.  Make sure to really get the stuffing down in the legs.  You can see that one of Toothina's legs is a little "skinny".  Finish stitching around until you reach the beginning.

You can add all sorts of embellishments.  I decided on a little hair accessory for Toothina.  You can't beat a nice hot pink and zebra combo!  I also thought (after I finished, of course) that you could hand stitch your child's name onto the back.

So many possibilities for such a small cost.  Like, literally under a dollar.  Nice!

I linked this project to http://www.alittletipsy.com/2011/08/diy-under-5-lucky-penny.html but have NO idea how to get her link button onto my post.  Help?